-
Notifications
You must be signed in to change notification settings - Fork 8
Launching VS Code
Note: On the University Managed Desktops, you should follow these steps to launch VS Code every time you need to use it!
Unfortunately, the way in which we need to launch Visual Studio Code in order for it to work properly with WSL-ROS is a bit convoluted. This seems to be something to do with the setup on the University Managed Desktops. Apologies that this isn't more straight forward, but as long as you follow the steps below at the start of each session, you should have no issues (hopefully!)
-
Launch VS Code from the Windows Application Menu by clicking the Windows Start Menu button
 , typing
 "vscode"(or just typing"code"works as well) and clicking on the application shortcut that should then appear in the list:
-
You should have already installed the Remote - WSL extension, as instructed on the Getting Started page. If so, then a green icon should be visible in the bottom left-hand corner of the application window:

Click this green icon and then click the
"New WSL Window using Distro..."option in the menu that appears:
-
Then, click on
"WSL-ROS"to select it (it should be the only one in the list).
-
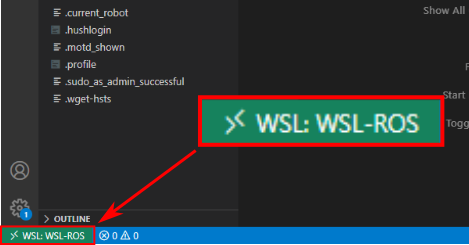
A new VS Code instance should launch, and in this one you should see the green "Remote" icon in the bottom left-hand corner again, but this time the icon should also contain the text:
"WSL: WSL-ROS", indicating that the remote extension has been launched inside WSL-ROS:
-
Keep this new VS Code instance open, but close down the original one behind it.
-
Next, access the WSL-ROS filesystem by:
- Clicking the "Explorer" icon in the left-hand toolbar (or use the
Ctrl+Shift+Ekeyboard shortcut), - Clicking the blue
"Open Folder"button, - Clicking
"OK"to select the default/home/student/filesystem location.

- Clicking the "Explorer" icon in the left-hand toolbar (or use the
-
Finally (we're nearly there, I promise!), you should be presented with a popup, asking if you trust the
/home/student [WSL: WSL-ROS]folder. Tick the checkbox and click on the blue"Yes, I trust the authors"button:
-
You can now navigate the WSL-ROS filesystem in the explorer window on the left-hand side of the VS Code screen. You'll need to use this to locate the packages and scripts that you create throughout this course!

-
It is important to make sure that the WSL - Remote extension is enabled inside the WSL-ROS environment, so make sure you can always see this icon in the bottom left-hand corner of your VS Code screen:

If you don't see this then start again from the top!
COM2009/3009 Robotics Lab Course
Updated for the 2021-22 Academic Year
Dr Tom Howard | Multidisciplinary Engineering Education (MEE) | The University of Sheffield
The documentation within this Wiki is licensed under Creative Commons License CC BY-NC:
You are free to distribute, remix, adapt, and build upon this work (for non-commercial purposes only) as long as credit is given to the original author.