First of all I'm pretty new to this Tensorflow and machine learning concepts, so my Keras settings, model and layers will maybe look horrible to experts.
It will obviously need optimizations and changes, but it works as it is for my use case so I decided to share it with you here. Don't hesitate to open comments and issues on how to improve things.
- https://www.tensorflow.org/tutorials/keras/classification
- https://github.com/dracoboros/Cats-Or-Dogs/blob/master/src/CatsOrDogs.ipynb
tensorflow-classifier-mqtt is a set of Python script to classify a webcam capture into labels with Tensorflow and publish results to a MQTT (message queue) broker.
Training part will use Tensorflow 2, but classifying part will only use Tensorflow lite (lightweight Tensorflow interpreter, to be embedded in a RaspberryPi).
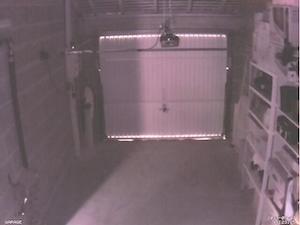
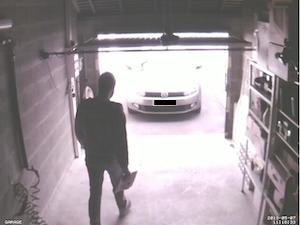
In my personal use case, it classifies a webcam view of my garage door, to predict if the door is opened or closed.
Tensorflow will need datasets to learn labels.
Organized into 'labeled' directories (closed/opened in my case) the dataset directory will need to contain all your training images, and need to be organized as the following:
dataset/
├── train
│   ├── closed
│   │   ├── closed.1.jpg
│   │   ├── closed.2.jpg
│   │   ├── closed.3.jpg
│   │   └── ...
│   └── opened
│       ├── opened.1.jpg
│       ├── opened.2.jpg
│       ├── opened.3.jpg
│       └── ...
└── validation
    ├── closed
    │   ├── closed.val.1.jpg
    │   ├── closed.val.2.jpg
    │   ├── closed.val.3.jpg
    │   └── ...
    └── opened
        ├── opened.val.1.jpg
        ├── opened.val.2.jpg
        ├── opened.val.3.jpg
└── ...First install requirements, only Tensorflow2 is needed here:
pip install tensorflowThen launch the training process:
python train.py

################################################################################
Training model...
Train for 500 steps
Epoch 1/5
500/500 [==============================] - 111s 223ms/step - loss: 0.8497 - sparse_categorical_accuracy: 0.9520
Epoch 2/5
500/500 [==============================] - 102s 205ms/step - loss: 0.0192 - sparse_categorical_accuracy: 0.9964
Epoch 3/5
357/500 [====================>.........] - ETA: 28s - loss: 0.4557 - sparse_categorical_accuracy: 0.9486
(...)
And finaly convert the Tensorflow model to a Tensorflow lite model:
tflite_convert --output_file=./model/model.tflite --saved_model_dir=./modelYou should end up with model.tflite and model.labels files, those will be used in the classification step:
ls -lah model/

total 37032
drwxr-xr-x   7 rsaikali  staff   224B  2 mar 10:55 .
drwxr-xr-x  15 rsaikali  staff   480B  2 mar 11:04 ..
drwxr-xr-x   2 rsaikali  staff    64B  2 mar 10:55 assets
-rw-r--r--   1 rsaikali  staff    13B  2 mar 10:55 model.labels
-rw-r--r--   1 rsaikali  staff    18M  2 mar 10:55 model.tflite
-rw-r--r--   1 rsaikali  staff    73K  2 mar 10:55 saved_model.pb
drwxr-xr-x 4 rsaikali staff 128B 2 mar 10:55 variablesFirst install requirements, Tensorflow lite for RaspberryPi will be used here, but you can find the correct version for your platform here: https://www.tensorflow.org/lite/guide/python
pip install https://dl.google.com/coral/python/tflite_runtime-2.1.0.post1-cp37-cp37m-linux_armv7l.whl
pip install opencv-python paho-mqtt
Then you'll need a few environment variables to setup and configure the observed webcam and the MQTT broker information:
export WEBCAM_URL=http://webcam.local:8080
export WEBCAM_CHECK_EVERY=1

export MQTT_SERVICE_HOST=mosquitto.local
export MQTT_SERVICE_PORT=1883
export MQTT_SERVICE_TOPIC=home/garage/door
So you can launch classification:
rsaikali$ python classify.py
2020-03-02 11:26:29,702 [tensorflow-classifier-mqtt-service]    DEBUG ################################################################################
2020-03-02 11:26:29,702 [tensorflow-classifier-mqtt-service]    DEBUG # WEBCAM_URL=http://webcam.local:8080
2020-03-02 11:26:29,702 [tensorflow-classifier-mqtt-service]    DEBUG # WEBCAM_CHECK_EVERY=1.0
2020-03-02 11:26:29,702 [tensorflow-classifier-mqtt-service]    DEBUG # MQTT_SERVICE_HOST=mosquitto.local
2020-03-02 11:26:29,702 [tensorflow-classifier-mqtt-service]    DEBUG # MQTT_SERVICE_PORT=1883
2020-03-02 11:26:29,703 [tensorflow-classifier-mqtt-service]    DEBUG # MQTT_SERVICE_TOPIC=home/garage/door
2020-03-02 11:26:29,703 [tensorflow-classifier-mqtt-service]    DEBUG # MQTT_CLIENT_ID=tensorflow-classifier-mqtt-service
2020-03-02 11:26:29,703 [tensorflow-classifier-mqtt-service]    DEBUG ################################################################################
2020-03-02 11:26:29,703 [tensorflow-classifier-mqtt-service]     INFO Found labels:  closed | opened
2020-03-02 11:26:29,703 [tensorflow-classifier-mqtt-service]     INFO Opening model: model/model.tflite
2020-03-02 11:26:29,728 [tensorflow-classifier-mqtt-service]     INFO Opening video: http://webcam.local:8080
2020-03-02 11:26:29,792 [tensorflow-classifier-mqtt-service]     INFO Entering main loop...
2020-03-02 11:26:29,801 [tensorflow-classifier-mqtt-service]     INFO [predicted_label=closed] [score=100.0000%] [time=8.51ms] output=[1.0000000e+00 1.9425804e-14]
2020-03-02 11:26:30,814 [tensorflow-classifier-mqtt-service]     INFO [predicted_label=closed] [score=100.0000%] [time=8.13ms] output=[1.0000000e+00 2.5105892e-14]
2020-03-02 11:26:31,825 [tensorflow-classifier-mqtt-service]     INFO [predicted_label=closed] [score=100.0000%] [time=7.50ms] output=[1.0000000e+00 4.6465178e-14]
#
# ...opening garage door...
#
2020-03-02 11:28:14,126 [tensorflow-classifier-mqtt-service]     INFO [predicted_label=opened] [score=99.9999%] [time=9.92ms] output=[9.5709743e-07 9.9999905e-01]
2020-03-02 11:28:15,137 [tensorflow-classifier-mqtt-service]     INFO [predicted_label=opened] [score=100.0000%] [time=9.16ms] output=[6.0946927e-16 1.0000000e+00]
2020-03-02 11:28:16,151 [tensorflow-classifier-mqtt-service]     INFO [predicted_label=opened] [score=100.0000%] [time=7.98ms] output=[7.190952e-16 1.000000e+00]
Looks like predicted_label switched form closed to opened... as expected!
An image is available on Docker Hub: rsaikali/tensorflow-classifier-mqtt
Needed environment is obviously the same as the standalone script mechanism, described in the Dockerfile:
docker run --name tensorflow-classifier-mqtt \
           --restart=always \
           --net=host \
           -tid \
           -e WEBCAM_URL=http://webcam.local:8080 \
           -e WEBCAM_CHECK_EVERY=1 \
           -e MQTT_SERVICE_HOST=mosquitto.local \
           -e MQTT_SERVICE_PORT=1883 \
           -e MQTT_SERVICE_TOPIC=home/garage/door \
           -e MQTT_CLIENT_ID=tensorflow-classifier-mqtt-service \
rsaikali/tensorflow-classifier-mqttTo build an linux/arm/v7 docker image from another architecture, you'll need a special (experimental) Docker multi-architecture build functionality detailled here: Building Multi-Arch Images for Arm and x86 with Docker Desktop
You'll basically need to activate experimental features and use buildx.
export DOCKER_CLI_EXPERIMENTAL=enabled
docker buildx create --use --name build --node build --driver-opt network=host
docker buildx build --platform linux/arm/v7 -t <your-repo>/tensorflow-classifier-mqtt --push .
Note: build step will take a while to run as numpy is really long to install.
Docker image will embed the Tensorflow lite model and labels files.

