This software is licensed under the Personal Use License (PUL).
- You may use this software for personal, non-commercial purposes.
- Redistribution, modification, and commercial use are not permitted.
Only supports the Swedish and the US keyboard layouts at the moment but feel free to add more
Thank you Earle Philhower for the arduino-pico core for the rp2040 boards, without you this wouldn't be possible
- Raspberry Pi Pico W and not a regular Raspberry Pi Pico.
- Computer so that you can flash the firmware file.
- Micro-usb cable that can transmit and receive data.
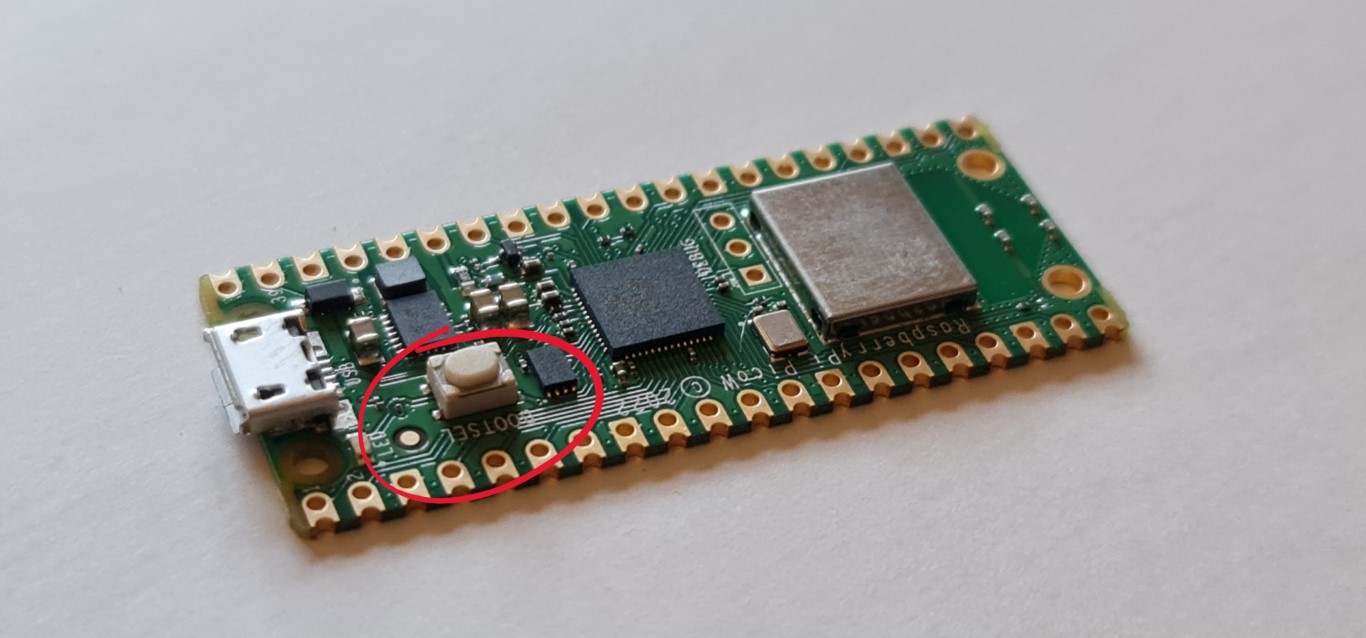
2. Release the BOOTSEL button and make sure that a storage device with the name RPI-RP2 has been connected. If you don't see a storage device it may be due to faulty drivers or most likely because you're using a cable that doesn't transmit data.

MIN 0
MAX 1
PAYLOAD payload1.txt
NAME bluetooth-badusb
BLUETOOTH 1
LANGUAGE US
4. MIN is the shortest amount of time a keypress can take. MAX is the longest amount of time a keypress can take. Between every keypress there is a random delay between MIN and MAX. PAYLOAD is the payload that will be executed. NAME is what the badusb will show up as in a bluetooth menu. BLUETOOTH is whether it should connect via bluetooth or USB. LANGUAGE sets the layout to US, SE for Swedish is also supported.
STRING 123
DELAY 500
CTRL ALT DELETE
KEY DOWN
KEY DOWN
KEY DOWN
ENTER
DELAY 1000
GUI
DELAY 100
GUI r
6. You can either create your own scripts or you can find scripts on the internet. Beware that many scripts have different syntax than this version of duckyscript. You may need to modify some parts.
7. When you have connected to the badusb via bluetooth you only have to press capslock twice for it to start typing. When it is done executing your script you can press capslock twice again and it will retype your script.
You may need to eject the badusb storage device to save the files you created/modified. On most operating systems you right-click the storage device and press the eject button.
- Download the Arduino IDE
- Install the Earle Philhower arduino-pico core (https://github.com/earlephilhower/arduino-pico?tab=readme-ov-file#installation)
- Navigate to the "Tools" tab
- Select the Raspberry Pi Pico W board
- Select the "IPv4 + IPv6 + Bluetooth" option under "IP/Bluetooth Stack"
- Select the "2MB (Sketch: 1MB, FS: 1MB)" option under "Flash Size"
- Either upload directly to your Pico with the upload button or press the "Export Compiled Binary" button under the "Sketch" tab